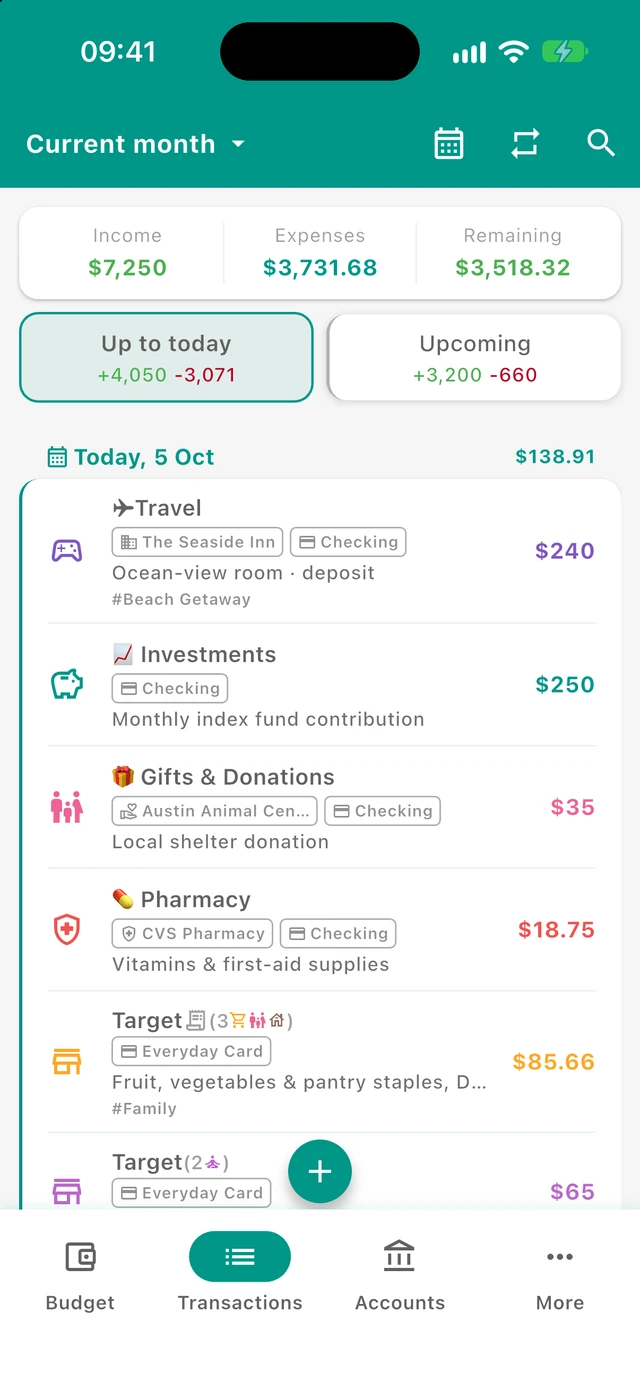
Accessing the Transactions Screen
You can access the Transactions Screen by:
- Tapping the "Transactions" tab in the bottom navigation
If there are scheduled transactions that still require confirmation, the Transactions tab shows a small question-mark badge as a reminder.
Screen Layout
Period Selector (Top Bar)
At the top of the screen, the selected budget period is displayed.
This can be:
- A calendar month: Current month for the actual current month; otherwise, just the month name if it is in the current year (for example,
Septemberwhen the current year is 2026), or the month and year for another year (for example,September 2025) - A custom budget period with its own name
- A custom budget period shown by date range when it has no name
All data on the screen - summary and transaction list - follows that selected budget period.
Actions:
- Tap the period name to open the budget period picker
- Switch between Month and Other Periods
- Choose another month or a saved custom budget period
When a past or future calendar month is selected, a Back to current month button with a curved back arrow appears without a filled background above the Summary Card. It stays visible while the transaction list scrolls. Tap it to return to the current calendar month without opening the period picker or a confirmation; the summary and list update, and the button disappears. The selected History or Upcoming view is preserved. The button is hidden for the current month and for all custom budget periods. Returning does not change existing transactions or plans.
Top Bar Buttons
The top bar contains several action buttons:
- Calendar Icon - Opens the Daily Transactions view where you can browse transactions by specific dates on a calendar
- Repeat Icon - Opens the Recurring Transactions screen to manage subscriptions, bills, and regular income
- Search Icon - Opens the Transaction Search screen to find specific transactions
For charts and spending insights, use Analytics from the Budget screen (pie chart icon in the top bar) or from category/section menus elsewhere in the app.
Summary Card
At the top of the transactions list, a Summary Card shows income, expenses, and balance for the selected budget period. The totals include all budget transactions (those linked to budget categories) in that period, including both past and upcoming.
Three-Column View
When you have both income and expenses:
- Income – Total money received (shown in income color)
- Expenses – Total money spent (shown in the app's primary color)
- Balance – The difference between income and expenses
Visual Indicators
- Income color = Income or positive balance
- Primary color = Expenses
- Red = Negative balance (expenses exceed income)
Single-Line View
If you only have income or only have expenses for the selected period, the Summary Card displays a simplified single-line format showing just that information.
History and Upcoming Tabs
When you have both past transactions and future scheduled transactions (and each section has at least some income or expenses), the screen displays two toggle buttons:
History Tab
Shows all transactions from today and earlier, sorted with the most recent transactions first.
Upcoming Tab
Shows all future transactions (scheduled, recurring, or planned), sorted with the soonest transactions first.
Tab Information:
- Each tab displays the total income and expenses for that section
- Income is shown in income color with a "+" prefix
- Expenses are shown in red with a "-" prefix
- Tap a tab to switch between History and Upcoming views
Note: If you only have past transactions or only have future transactions, the tabs won't appear—the screen will automatically show whichever section has data. Tabs also won't appear if one section has only transfers or balance adjustments (no income or expenses).
Confirmation Required Block
If you have recurring transactions that require confirmation before being applied, they appear in a special highlighted section at the top of the transaction list.
What are confirmation-required transactions? These are scheduled transactions that need your approval before they affect your account balances. This is useful for recurring expenses that may vary in amount or that you want to verify before recording.
Actions:
- Tap a confirmation-required transaction to open options for confirming, skipping, or modifying it
Transaction List
The list shows budget transactions for the selected budget period - that is, income and expense transactions linked to budget categories. Transactions are grouped by date with clear date headers. Each date section shows all transactions that occurred on that day. Within a day, transactions from the same receipt or the same contact may appear as a grouped row with a header - tap the group to open the full list for that receipt or contact.
Transaction Display
Each transaction shows:
- Category icon (on the left) - The icon of the budget section this transaction belongs to
- Category name - The budget category (e.g., "Groceries", "Salary", "Rent")
- Amount (on the right) - The transaction amount with color coding:
- Income color with "+" prefix = Income
- Section color = Expenses (matches the category's budget section color)
Additional Transaction Details
Transactions may also display:
- Receipt icon - Shown after the category name when this row belongs to a receipt. Several items from the same receipt on the same day still appear as one group. If every item in that group uses the same category, the group title is that category name with the receipt icon after it. If the items use different categories, the group title is Receipt and the icon on the left is the receipt icon.
- Recurring icon (↻) - Indicates this transaction is linked to a recurring template
- Question mark icon (?) - Indicates the transaction requires confirmation
- Swap icon (↔) - Indicates this is a combined transaction (categorized expense plus transfer between accounts)
- Contact badge - Shows which person or business this transaction involves
- Account badge - Shows which account was used for this transaction
- Description - Any notes you added to the transaction
- Tags - Hashtags for additional categorization (shown as #tagname)
Preview Transactions
Future transactions from recurring templates appear slightly faded to indicate they are previews of upcoming scheduled transactions, not yet confirmed.
Transaction Types
Regular Transactions (Income/Expenses)
Standard income or expense transactions linked to a budget category. These are the primary transactions shown on this screen.
Combined Transactions (Expense + Transfer)
Transactions that are both categorized expenses and transfers between accounts. These show:
- A swap icon (↔) indicating a transfer component
- The category name and icon
- The expense amount
Note: Pure transfers between accounts, balance adjustments, and initial balances are not shown on the Transactions screen since they aren't linked to budget categories. To view those, go to the specific account's transaction history.
Transaction Actions
Tap a Transaction
For regular transactions: Opens the Edit Transaction screen where you can modify all details.
For preview/recurring transactions: Opens options to:
- Confirm the transaction
- Skip this occurrence
- Modify the amount or details
For confirmation-required transactions: Opens a confirmation dialog with options to confirm, skip, or edit.
Long-Press a Transaction
Long-pressing a transaction (except preview and confirmation-required ones) opens a quick actions menu with options to:
- Edit the transaction
- Edit receipt, when this transaction belongs to a receipt. Opens that receipt with all of its items, including items outside the current list
- Duplicate the transaction
- Delete the transaction
- Transform to receipt (for eligible expenses that are not already part of a receipt—creates a receipt from the transaction and opens the Add Receipt screen)
Adding New Transactions
At the bottom center of the screen, a single Add Transaction floating action button opens the Add Transaction screen where you can record income or expenses.
Long-press the + button at the bottom center to open Favourites. This shortcut is available only when at least one favourite template exists; a normal tap still opens a blank Add Transaction form. The scrollable bottom sheet lists all favourites in the order saved on Recurring Transactions, including favourites with a repeat schedule. A star appears beside the Favourites title. Favourites appear directly on the sheet background as tappable rows separated by subtle dividers. Repeat schedule text is hidden in this shortcut; view schedules on Recurring Transactions. Tap anywhere on a row to close the sheet and open a new transaction prefilled from that template, using today’s date. Transfers and balance adjustments open their corresponding forms. Review the details and save; opening a favourite does not save a transaction. If its amount is 0, the number picker opens automatically (the source-account amount for transfers). Dismiss the picker to return to the form, or dismiss the favourites sheet to return to the screen without adding anything. Add or remove favourites, edit, delete, and reorder them on Recurring Transactions; those controls are not shown in this shortcut.
To add a multi-item receipt instead, open Add Transaction in expense mode and tap the split icon next to the Category field. This opens the Add Receipt screen and carries over the selected account, date, contact, and typed amount when available. A selected category filters the store quick-select chips to contacts recently used with that category.
Loading More Transactions
The screen initially shows a limited number of transactions for faster loading. If you have more transactions:
"Show More" Button: When there are additional transactions to display, a "Show More" button appears at the bottom of the list. Tap it to load more transactions.
The list always shows complete days—if you have many transactions on a single day, all of them will be shown together rather than cutting off mid-day.
Empty State
If there are no transactions for the selected budget period, the screen displays:
- A receipt icon
- A message indicating no transactions exist for that period
This is a good reminder to start recording your income and expenses!
Tips for Using the Transactions Screen
- Review regularly - Check your transactions weekly to catch any errors or forgotten entries
- Use the search - The search function helps you quickly find specific transactions by amount, description, or category
- Check upcoming transactions - Review the Upcoming tab to see what bills and income are coming up
- Confirm recurring transactions - Don't forget to confirm or adjust scheduled transactions that require verification
- Use contacts and tags - Adding contacts and tags to transactions makes it easier to filter and analyze your spending later
- Use receipts - From Add Transaction, use the split icon next to the category field to split one purchase into multiple categorized items
- Switch periods easily - Use the period picker to review past months or saved custom budget periods