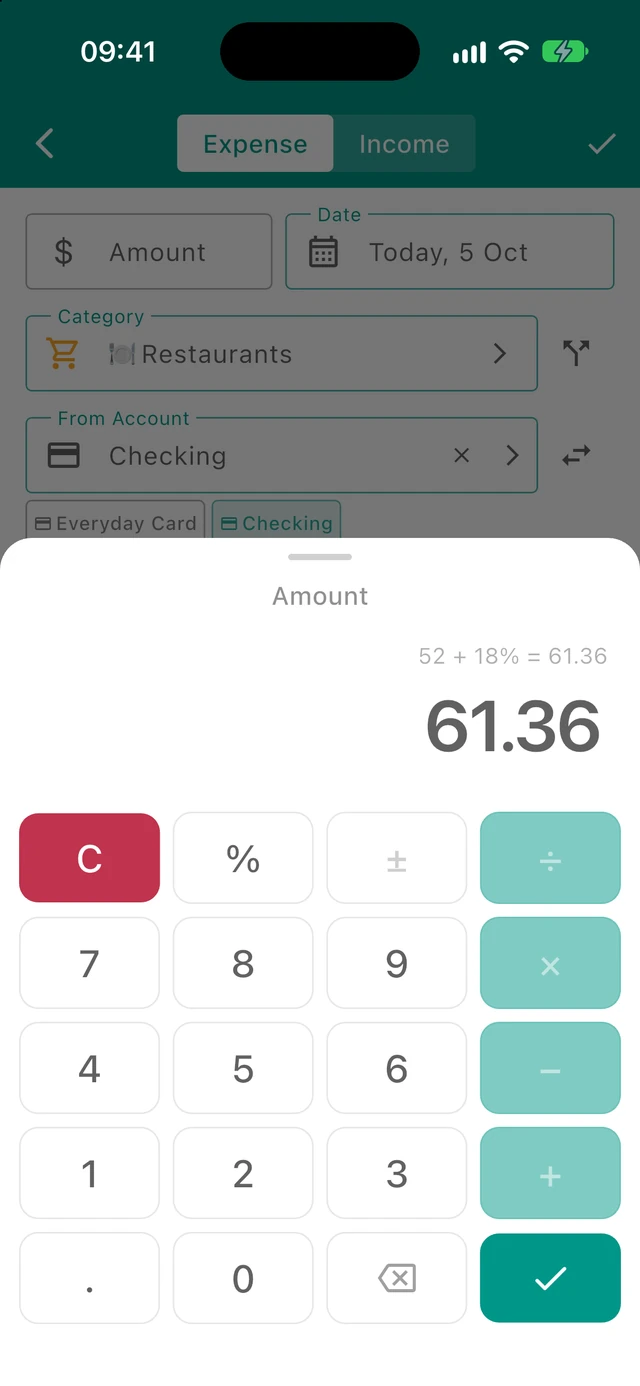
Accessing the Add Transaction Screen
You can open the Add Transaction screen by:
- Tapping the "+" button on the main Transactions screen or Budget screen
- Long-pressing that + button when favourites exist, then tapping a favourite in the bottom sheet. This opens a prefilled form dated today; if the template amount is 0, the number picker opens automatically. See Recurring Transactions for the shortcut and template types.
- Tapping "Add Transaction" from a category's menu on the Budget screen
- Tapping a category circle after opening a section from visual circles mode on the Budget screen (section circle → category bottom sheet → category)
- Using the "+" button when viewing an account's transactions
Receipt split shortcut (expense mode): In expense mode, a split icon appears next to the Category field. Tap it to open the Add Receipt screen and split one purchase into multiple categorized transactions.
Transaction Types
At the top of the Add Transaction screen, you'll see two toggle options:
Expense
Records money going out—purchases, bills, payments. This is the default selection.
Income
Records money coming in—salary, payments received, refunds. Tap "Income" to switch to recording income.
Note: When adding transactions from a receipt, only expense mode is available since receipts typically represent purchases.
Transaction Fields
Amount and Date Row
At the top of the form, you'll see:
Amount Field:
- Tap to open the calculator-style number picker
- Enter the transaction amount
- The calculator supports basic math operations (+, −, ×, ÷) for splitting bills or calculating totals
- Your currency symbol appears next to the field
- This top Amount field is always the budget amount in your app's main currency (the value used by budgets, analytics, and reports)
- When a foreign-currency account is selected, the label can include the main currency code (for example
Amount UAH) so it stays clear which currency this field uses
Date Field:
- Shows the transaction date in a friendly format (e.g., "Today", "Yesterday", "Mon, Jan 20")
- Tap to open the date picker and select a different date
- The date picker shows income and expense totals for each day, helping you navigate your history
Confirmation Required (Future Dates Only)
When you set a future date, a checkbox appears:
"Confirmation Required"
- Enable this if you want to verify the transaction before it affects your budget
- The transaction will appear in the "Confirmation Required" section on the Transactions screen
- Useful for planned expenses that might change in amount
Category
Category Field:
- Shows the selected budget category with its section icon and color
- Tap to open the category picker
- Categories are organized into sections (e.g., Food, Transportation, Income)
- For expenses, only expense categories are shown
- For income, income categories are shown; you can also select expense categories for income (e.g. to record refunds or money returned to a spending category)
- Hidden categories within a section can be revealed with Show more (+N); hidden sections (not in the current period) can likewise be revealed with Show more (+N) at the bottom of the picker
The category determines:
- Which budget the transaction counts toward
- The color and icon displayed for the transaction
- How the transaction is grouped in reports
For expense transactions, the split icon next to the category field opens Add Receipt. Budgetum carries over the selected account, date, contact, and any amount already typed as the receipt total. If a category is selected, store quick-select chips on Add Receipt show contacts recently used with that category. This shortcut is hidden for income, transfers, and transactions that are already part of a receipt.
Account
From Account / To Account Field:
- Shows which account this transaction uses
- For expenses: "From Account" (where the money comes from)
- For income: "To Account" (where the money goes)
- Tap to select from your active accounts
- Quick-select chips appear below the field showing your recently used accounts
Required vs Optional:
- For regular income/expense transactions, account selection is optional.
- For combined transactions (transfer mode enabled), both account fields become required.
- If you have no active accounts, the account field is hidden and you can still save regular transactions.
Recently Used Accounts: Below the account field, you may see small chips showing accounts you've used recently with this category. Tap a chip to quickly select that account. These suggestions are filtered to accounts that use the app's current main currency, so different-currency accounts are not offered as quick chips.
Foreign-currency accounts (normal income/expense): You can select an account whose currency differs from the app's main currency for a regular expense or income (not only for transfers). When you do:
- The top Amount field remains the budget amount in the main currency
- An extra account amount field appears below the account picker:
- Expenses: Debited (money leaving the account), in the account's currency
- Income: Credited (money entering the account), in the account's currency
- Both amounts are required when currencies differ. Budgets and reports use the budget amount; the account balance moves by the debited/credited amount
- Budgetum may offer a market-rate quick suggestion in the number picker (based on a live rate lookup). The suggestion is optional—you can accept it or type your own amount. Rates are not saved as a separate exchange-rate history in the app
- Changing the account to a different currency clears the account-amount field so you can enter the new currency amount
Receipts stay on the main currency: When adding or editing a receipt (or a receipt line), account selection is limited to accounts in your current main currency. Foreign-currency accounts are available for normal transactions and for multi-currency transfers, not for receipts.
Transfer Toggle (↔ button): Next to the account field, you'll see a swap icon. Tap it to enable "combined transaction" mode:
- This records both a budget transaction AND an account transfer in one step
- Useful when you pay from one account but want to record money also moving to another account
- When enabled, additional fields appear for the transfer destination and amount
- If either side uses a different currency, you can enter different from/to amounts; a market-rate quick suggestion may appear in the number picker for the other side
Contact
"Paid to" / "Received from" Field:
- Track who you paid or who paid you
- For expenses: "Paid to" (store, person, or business)
- For income: "Received from" (employer, client, payer)
- Tap to select an existing contact or create a new one
- Quick-select chips show recently used contacts for this category
Recently Used Contacts: Below the contact field, chips appear showing contacts you've transacted with recently for this category. Tap a chip to quickly select that contact.
Note: On the Add Transaction screen, this field only appears if you have the "Show contact on transaction creation" setting enabled. On the Edit Transaction screen, the contact field is always visible so you can view or change it.
Description
Description Field:
- Optional. Add extra notes or details about the transaction.
- Examples: "Table 4", "Refund for defective item", "Bonus from Q4 review"
- Tap to type freely
- Supports multiple lines for longer notes
Recently Used Descriptions: Below the description field, chips appear showing descriptions you've used before for this category. Tap anywhere inside a chip, including the space around its text, to quickly fill in that description.
Tags
Tags Field:
- Add labels to organize transactions beyond categories
- Multiple tags can be added to a single transaction
- Tags appear as #tagname format
- Tap to open the tag selector where you can:
- Select existing tags
- Create new tags
- Remove selected tags
Recently Used Tags: Below the tags field, chips appear showing tags you've used recently. Tap a chip to quickly add or remove that tag.
Note: On the Add Transaction screen, this field only appears if you have the "Show tags on transaction creation" setting enabled. On the Edit Transaction screen, the tags field is always visible so you can view or change tags.
Repeat and Favourites
Tap the Repeat row, arrow, or off switch to open repeat options. Turn on Favourite at the top to save a reusable template without needing a schedule. When no favourite templates are saved, a small, muted helper beneath the switch explains that favourites let you quickly add transactions without a repeat schedule. It is hidden when you open Repeat with at least one saved favourite. The switch keeps the page open; Back retains the choice in the transaction form. Selecting Do not repeat or a repeat preset returns immediately with the favourite choice preserved. Custom opens a separate schedule page; applying it also preserves Favourite.
- Favourite only: turn on Favourite, leave Do not repeat selected, return and save the transaction. No automatic transactions are generated.
- Favourite and scheduled: turn on Favourite, select a daily, weekly, monthly, yearly or custom schedule, then save.
- Scheduled only: choose a schedule with Favourite off, as before.
A small filled star beside the Repeat field name shows that the template is a favourite. There is no extra favourite subtitle; schedule details remain in the existing helper below the field when repetition is enabled. The switch controls automatic repetition and stays off for favourite-only templates. Switching repetition off keeps the favourite mark. End conditions (never, date or occurrence count) appear only with a schedule, along with a next-transaction date control where supported. Changes are saved only when you save the transaction form.
Availability and Pro: Repeat is not offered when adding receipt items or a transaction from a template, or when editing a transaction already linked to a template. For linked transactions, edit the template from Recurring Transactions instead. All saved templates, including favourite-only and inactive templates, share the existing free limit of five; Pro allows unlimited templates. At the limit, tapping the Pro-marked Repeat field opens the upgrade page.
Open Recurring Transactions → Favourites to use saved favourites. This is the first filter and opens by default when favourites exist; otherwise All opens. Drag row handles to save a manual order, or tap a row for Add Transaction, Add to Favourites or Remove from Favourites, Edit, and Delete. See Recurring Transactions for detailed steps.
Quick Entry Features
Search History Button
At the bottom center of the screen, a floating search button opens Transaction History Search:
- Search through your past transactions
- Select a previous transaction to copy its details (category, description, amount, contact, tags)
- Great for quickly entering similar transactions
Smart Suggestions
The app learns from your habits and suggests:
- Contacts you frequently use with the selected category
- Descriptions you've used before
- Accounts you typically use with each category
Account suggestions are limited to accounts in your current main currency.
Manage notes and description suggestions
On Add Transaction, Edit Transaction, and the receipt item form, long-press a description suggestion below the Description field to open a bottom sheet:
- Hide this suggestion hides that exact description in the selected category.
- Hide all suggestions in this category hides every description currently suggested for that category, including suggestions beyond the visible chips or excluded by the text you have typed. The category name appears below the action. Other categories are unaffected. New descriptions can still appear later; using an already hidden description again does not unhide it.
- Manage notes opens a page for the selected category, with the category name in the app bar.
When a category is selected and the Description field is empty (or contains only spaces), tap the three-dot button on its right to open the same menu without Hide this suggestion, even when no chips remain. The button is hidden when no category is selected or when you enter a note. The document icon on the left is decorative and has no long-press action. There is no additional settings item.
Hiding takes effect immediately, without a confirmation dialog. It does not change the current Description field or any saved transaction notes. You can still type hidden descriptions manually. Hidden choices are remembered across app launches and apply to both Add and Edit Transaction.
When opened from a receipt item, the same controls also include notes from items already added to that receipt; see Receipt descriptions for draft-note behavior.
Manage notes starts on the Visible tab, showing each distinct, nonempty description used by transactions in the category that has not been hidden. Repeated transaction descriptions appear only once. The Hidden tab shows descriptions hidden in that category. Rows show only the description and its action icon:
- On Visible, tap the hide (crossed-out eye) icon to hide that description. It leaves Visible and becomes available in Hidden.
- On Hidden, tap the restore icon to unhide the description. It leaves Hidden and returns to Visible if a transaction in the category still uses it.
- Tapping the description or the rest of the row does nothing. Neither action inserts text into the transaction form or edits saved notes.
Tap the search icon at the top right to expand Search notes inside the app bar. Search filters descriptions in the current tab (case-insensitive), across the entire category, including records not yet loaded. Switching tabs keeps the search text. Tap the search-off icon in the app bar to close search and clear the filter.
Each tab initially loads up to 100 descriptions, sorted by description. Scroll to the bottom and tap Load more to load the next 100; the button disappears when every matching result is loaded. Changing or closing search, or switching tabs, starts again with the first 100 results.
Tap the three-dot button at the top right for bulk actions:
- On Visible, Hide all (N) hides every visible description in the category. With a nonempty search, Hide filtered (N) hides only matching descriptions.
- On Hidden, Restore all (N) restores every hidden description in the category. With a nonempty search, Restore filtered (N) restores only matching descriptions.
N is the complete matching record count, not the number of loaded rows or transactions. For example, searching “coffee” on Hidden and selecting Restore filtered (105) restores all 105 matching descriptions even if only 100 are loaded. Bulk actions run immediately without confirmation; other categories and saved transaction notes are unchanged. Search text and the selected tab remain in place. The bulk action is disabled when its count is zero. The three-dot and row action buttons are disabled while results load or an action is running; search and tab switching are disabled while a hide or restore is running.
The page shows a loading spinner while opening or changing filters, No visible notes or No hidden suggestions when the current tab has no records, or No matching suggestions when records exist in that tab but none match the search. Use Back to return to the transaction form; entered values are preserved and suggestions are refreshed. A restored suggestion appears when the category and typed text match, subject to the usual limit of ten visible chips. To manage another category, return to the form, select that category, and open Manage notes again.
Saving Transactions
Single Save Mode
When you open Add Transaction from a category tap:
- Tap the checkmark (✓) to save and close
- The transaction is saved and you return to the previous screen
Multi-Entry Mode
When you open Add Transaction from the main + button:
- Tap the checkmark (✓) to save
- A "Transaction added" confirmation appears
- The form clears so you can quickly add another transaction
- The category stays selected for faster entry of multiple items in the same category
Editing Transactions
Accessing Edit Transaction
Open the Edit Transaction screen by:
- Tapping any transaction in your transaction list
- Tapping "Edit" from a transaction's options menu
What You Can Change
All fields can be edited:
- Amount and date
- Category
- Account(s)
- Contact
- Description
- Tags
- Recurring settings (for transactions not yet linked to a recurring template)
Edit Screen Notes
- Contact and tags: The contact and tags fields are always visible when editing (they are not hidden by the "Show contact on transaction creation" or "Show tags on transaction creation" settings).
- Quick suggestions: Description suggestion chips appear when editing, same as on Add. Recently used contact and account chips are only shown on the Add Transaction screen.
- Foreign-currency transactions: If the transaction uses a foreign-currency account, edit shows the saved budget amount and the saved Debited/Credited account amount. Changing either amount updates that stored value; Budgetum does not rewrite historical amounts from a live rate.
- Combined transactions (transfers): When editing a combined transaction, account selection is limited to accounts in your app's current currency. Different-currency transfers can be created on the Add screen; when editing, you can still change amounts but the account picker will only offer accounts in the current currency.
- Receipt lines: The amount is the unit price, and an Items Count field sits beside it. Budgets and the account use unit price × count. Changing the count updates only this line. Duplicate copies the unit price into a new transaction dated today; the copy is not part of the receipt and its count is 1. Account selection stays on the main currency.
Also update recurring template amount
When editing a transaction that is linked to a recurring template, and you change the budget amount (or the foreign-currency Debited/Credited amount), a checkbox appears:
- Also update recurring template amount
Leave it off to change only this occurrence. Check it to also write the new amount(s) back to the recurring template so future generated occurrences use the updated template amount. The same checkbox appears when editing a linked transfer or balance adjustment from their edit screens.
Additional Edit Options
The three-dot menu (⋮) in the top right provides extra options:
Change to income / Change to expense:
- Switches the transaction between income and expense
- The title area shows an Income or Expense badge for the current type; this menu is how you change it (there is no type toggle on Edit)
- Hidden for receipt-linked items
- Switching type swaps the from and to accounts
- If you switch to expense and the current category is an income category, the category is cleared and you must select a category before saving
- Switching to income keeps an expense category (for refunds or money returned to a spending category)
- The Also update recurring template amount checkbox is hidden while the edited type differs from the linked template’s type
Edit receipt:
- Shown when this transaction belongs to a receipt
- Opens that receipt with all of its items, including items that are not this line
- When you leave the receipt, you return to the list, not this transaction editor
Transform to Receipt:
- Converts a single expense transaction into a multi-item receipt
- Useful when you realize a transaction should be split across multiple categories
- Only available for expense transactions that are not already part of a receipt and are not combined transfers (the source account, if any, must also use your main currency)
Duplicate:
- Creates a copy of the transaction with today's date
- All other details are preserved
- Opens as a new Add Transaction screen with the values pre-filled
Delete:
- Permanently removes the transaction
- You'll be asked to confirm before deletion
- This action cannot be undone
Update Similar Transactions
When you change a description, a checkbox may appear:
"Update X similar transactions"
- If you have other transactions with the same original description
- Check this box to update all of them to the new description
- Useful for fixing typos or improving consistency
Combined Transactions (Transfer + Budget)
For advanced tracking, you can create a combined transaction that:
- Records a budget transaction (expense or income to a category)
- Records an account transfer at the same time
How to Enable
- Select an account in the "From Account" field
- Tap the swap icon (↔) next to the account field
- A second account field appears for the transfer destination
Transfer Amount
When creating a combined transaction, you can select accounts with different currencies:
- You can enter different amounts for each side
- The number picker may offer a market-rate quick suggestion between the two account currencies
- This handles exchange rate differences without storing a permanent rate table
When editing an existing transaction, account selection is limited to your app's current currency (see "Edit Screen Notes" under Editing Transactions).
When to Use
Combined transactions are helpful when:
- You receive income into one of your accounts and want to record the transfer
- You record savings as an expense and transfer to your savings account
- You want to track both the category spending and the money movement
Tips for Adding Transactions
-
Add transactions promptly - Record expenses right after they happen while details are fresh
-
Use the search feature - The history search helps you quickly find and copy past transactions
-
Be consistent with descriptions - Use similar descriptions for similar transactions to make searching easier
-
Assign contacts - Linking transactions to contacts helps you analyze spending by store or person
-
Use tags for special tracking - Tags let you track things across categories (like vacation expenses)
-
Check the date - Make sure the date is correct, especially when entering transactions from receipts or statements
-
Set up recurring transactions - Save time by setting up repeating bills and income once
-
Use quick-select chips - The suggestion chips below fields speed up entry significantly
-
Review before saving - Double-check the amount and category before tapping save
-
Foreign-currency spending - For a USD card with a UAH budget (for example), enter the real card charge as Debited/Credited and the budget value as Amount so reports stay in your main currency