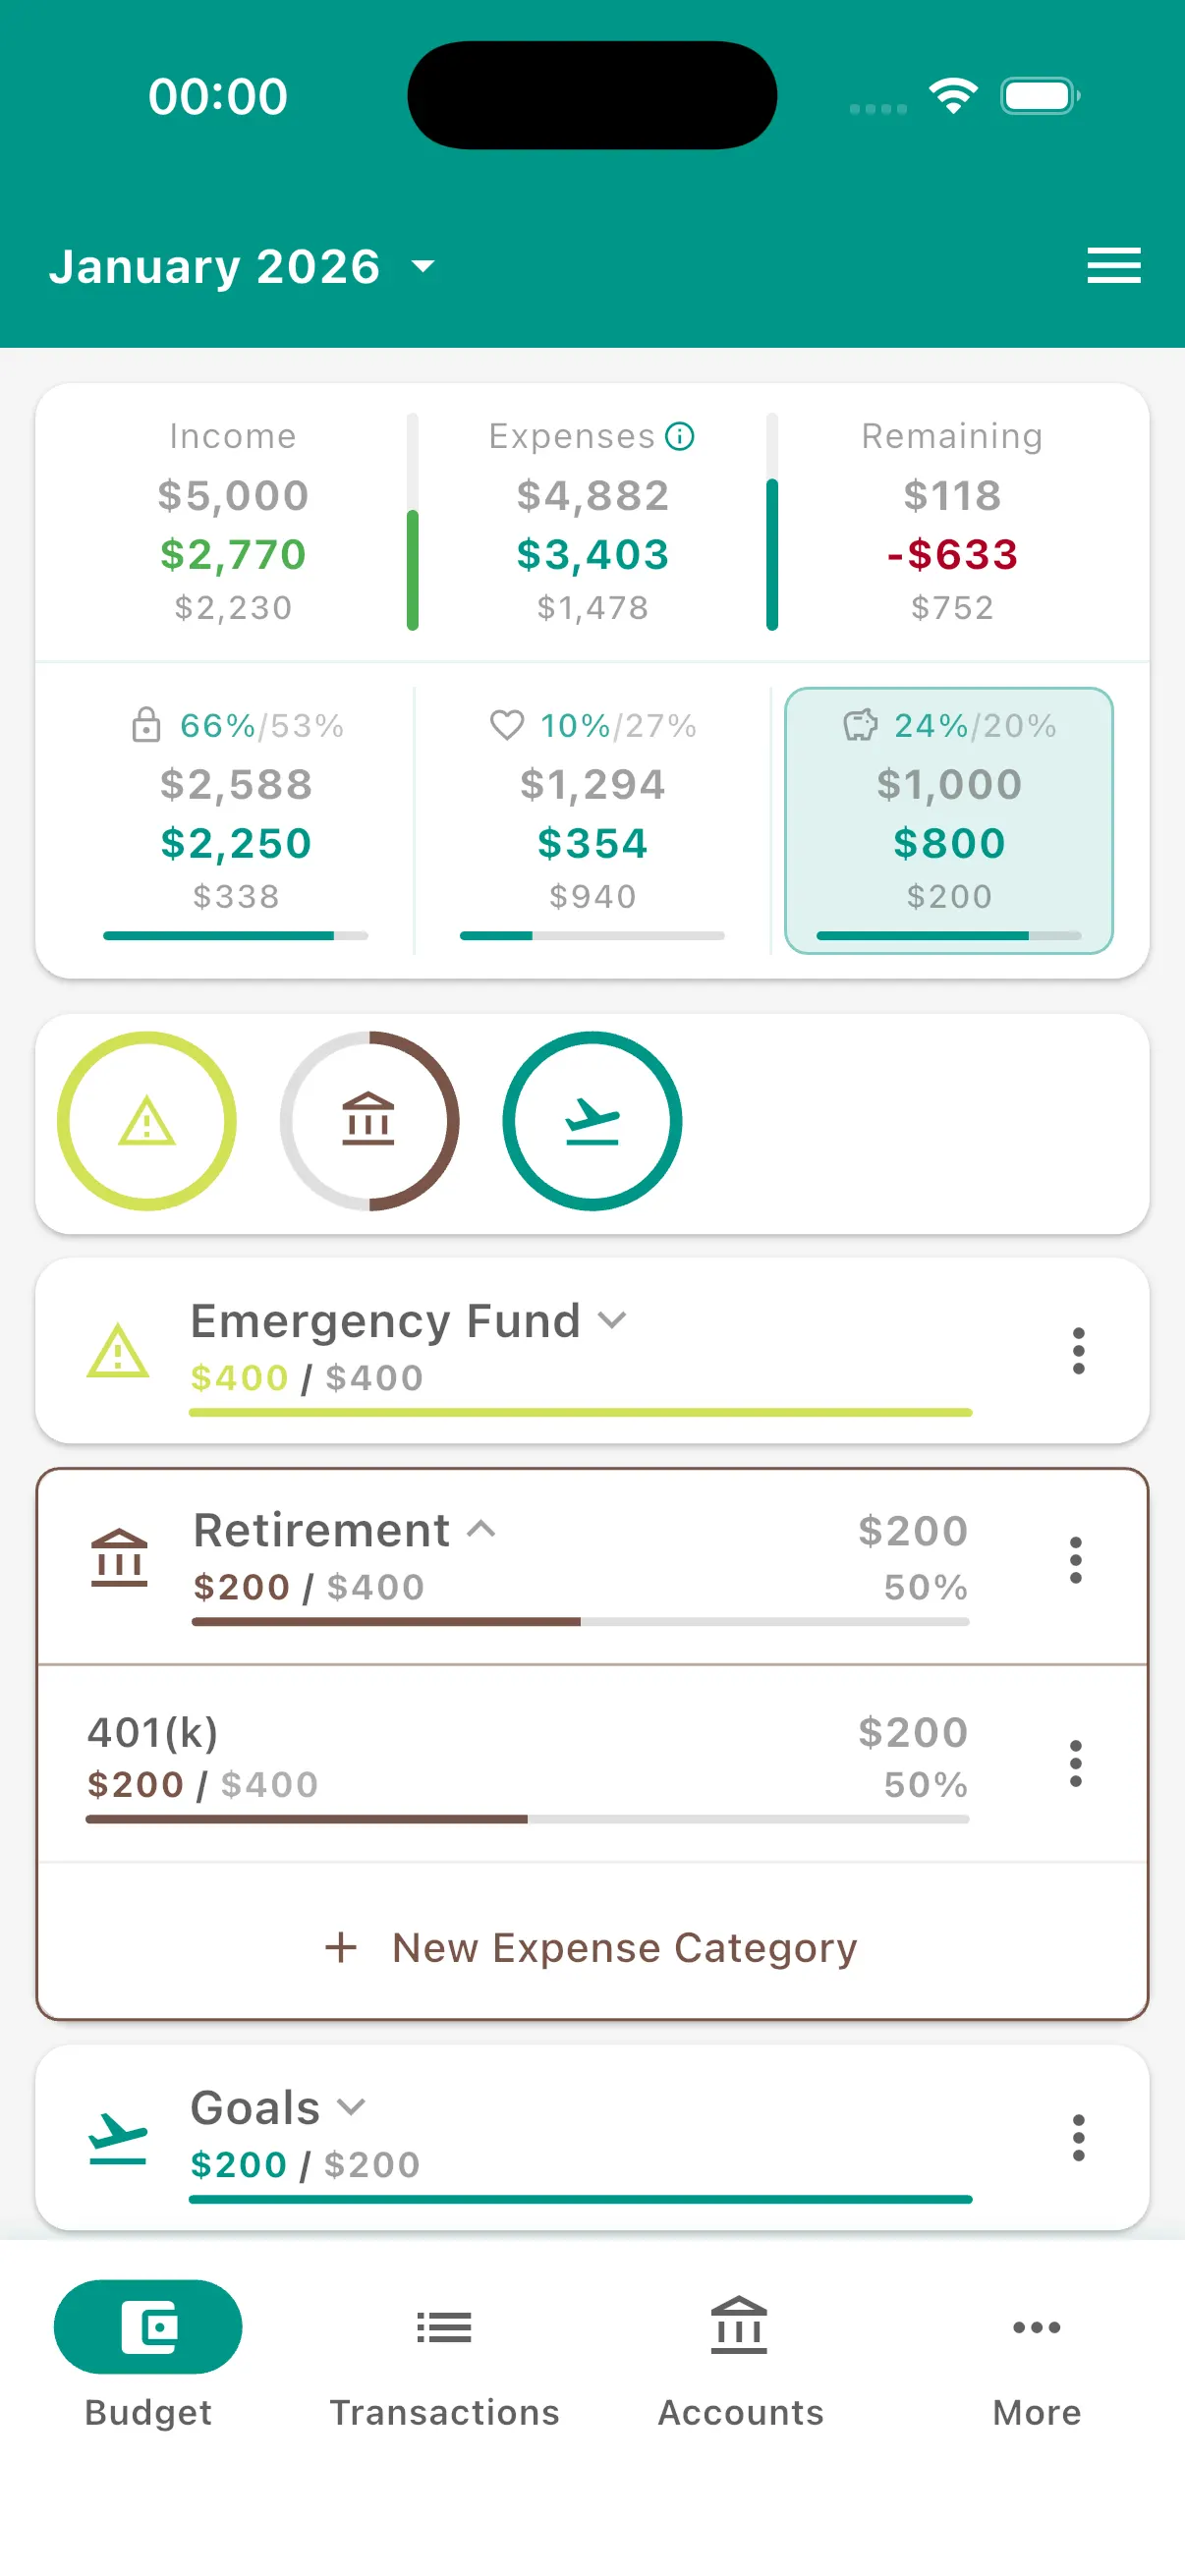
Accessing the Budget Screen
The Budget Screen is the app’s home screen. You can access it by:
- Opening the app (it opens by default)
- Tapping the Budget tab in the bottom navigation
Screen Structure
Rating invitation
After either 7 elapsed days since the recorded first-open date or at least 10 saved transactions across the app, an Enjoying Budgetum? card can appear below the summary and before the remaining budget content. If the summary is hidden, the card is at the top of the scrollable content. It is available to free and Pro users; previous rating-invitation dismissals or rating actions can prevent it from appearing.
- × / Close, at the top right of the card, permanently hides it on Budget and clears the rating-related dot on More. The More rating card remains available without a close button. Restarting the app or changing periods does not bring the Budget card back.
- Rate App opens the App Store review form on iOS or the Google Play listing on Android, where you select the stars under Rate this app. Successfully opening the store hides both invitation cards, even if you return without submitting a rating. If the store cannot open, an error appears and the cards remain available.
- The regular Rate App row in More remains available afterward. A separate feedback invitation may still cause a More dot.
See More — Rate App for eligibility details and the separate feedback invitation.
Add Transaction and favourite shortcut
Long-press the + button at the bottom center to open Favourites. This shortcut is available only when at least one favourite template exists; a normal tap still opens a blank Add Transaction form. The scrollable bottom sheet lists all favourites in the order saved on Recurring Transactions, including favourites with a repeat schedule. A star appears beside the Favourites title. Favourites appear directly on the sheet background as tappable rows separated by subtle dividers. Repeat schedule text is hidden in this shortcut; view schedules on Recurring Transactions. Tap anywhere on a row to close the sheet and open a new transaction prefilled from that template, using today’s date. Transfers and balance adjustments open their corresponding forms. Review the details and save; opening a favourite does not save a transaction. If its amount is 0, the number picker opens automatically (the source-account amount for transfers). Dismiss the picker to return to the form, or dismiss the favourites sheet to return to the screen without adding anything. Add or remove favourites, edit, delete, and reorder them on Recurring Transactions; those controls are not shown in this shortcut.
Period selector (top bar)
At the top of the screen you’ll see the currently selected budget period.
This can be:
- A calendar month: Current month for the actual current month; otherwise, just the month name if it is in the current year (for example,
Septemberwhen the current year is 2026), or the month and year for another year (for example,September 2025) - A custom budget period with its own name
- A custom budget period shown by date range when no name was given
Actions:
- Tap the period name to open the full period picker
- In the picker, switch between Month and Other Periods
- The Month tab shows available months with income and expense totals
- The Other Periods tab shows your saved custom budget periods grouped into Future, Active, and Previous
- In the Other Periods tab, tap Add in the header to create a new custom budget period
- An Edit button with a calendar icon (tooltip Edit) always appears next to the period name. It opens the editor for whatever is currently selected: the calendar month, or the custom period.
When a past or future calendar month is selected, a Back to current month button with a curved back arrow appears without a filled background above the Summary Card and stays visible while the budget content scrolls. Tap it to select the current calendar month and show its budget immediately, without opening the period picker or a confirmation. The button then disappears. If the Summary Card is hidden in Display Settings, the button still appears at the top of the budget content. It is not shown for the current month or for any custom budget period. Returning does not change existing transactions or plans.
Editing the selected month
When a calendar month is selected, tap Edit next to the period name. The screen title is that month (for example, September 2026).
Budget amount (optional)
- Tap the field to open the Number Picker (titled Budget amount)
- Helper text: Leave empty to use planned income.
- Clear a saved amount with the × on the field
- Entering 0 is treated as empty
- If you set an amount greater than 0, the Summary Card’s first column is labeled Budget instead of Income, and that amount is used as the period’s main income/budget total instead of planned income from income categories
Income section
- Switch labeled Income section
- Helper: Show or hide the income section on the budget screen.
- On (the default): income categories and income totals appear as usual
- Off: the income section is hidden on Budget for that month
Tap the checkmark in the top bar to save. Leaving without saving (Back or close) discards the changes. These month settings apply only to that calendar month and are separate from a custom period’s settings.
When a custom period is selected:
- The same Edit button opens the custom period editor (see Custom Budget Periods)
- A small history icon appears in the title if the period is already in the past
- The Budget screen uses that period's exact date range instead of a calendar month
Top-right actions
The Budget screen has three main actions in the top-right corner:
- Analytics (pie chart) — opens Analytics & Reports for the currently selected budget period
- Settings — opens Display Settings directly so you can quickly change how the Budget screen looks and what totals mean
- Menu (☰) — opens additional actions
The menu icon (☰) opens:
- New Expense Section — create a new budget section to group categories
- Add Category — add a new income or expense category
- Change Order — rearrange sections and categories
- Display Settings — another way to open the same display/settings screen
- Copy Plan — import selected category plans from another month or custom period into the current one
- Export PDF — configure export settings, create a PDF snapshot, or generate a link to a web copy of the current budget plan
- Collapse Sections — collapse all sections at once for a more compact view
Summary Card
At the top of the budget screen there’s a Summary Card showing your overall financial picture for the currently selected period.
Three-column view
When you have both income and expenses:
- Income — planned income (gray) and actual income received (income color). If the selected month or custom period has a Budget amount set, this column is labeled Budget instead of Income
- Expenses — planned expenses (gray) and actual spending (primary color)
- Remaining — the difference between income and expenses
Visual indicators
- Progress bars between columns fill from bottom to top against the summary’s planned amounts. Above the expense plan, the full bar represents total spending: the primary-colored lower portion is covered by the plan and the red upper portion is the excess, separated by a thin divider. A plan of 500 with 1,000 spent produces equal portions. Small excesses keep their exact proportions, without a minimum red size or extra text.
- The same expense split appears in the horizontal bar when only expenses are shown and in the expanded Needs and Wants bars. Income and Savings progress use the income color for the planned share and a lighter green for amounts above a positive plan, with a thin divider between them.
- Progress requires planned values to be enabled and a positive actual amount. A zero or missing plan does not hide progress: expenses show fully red, while income and Savings show fully in the income color, without a divider. This applies to vertical summary bars, single-line bars, and the expanded type bars. Zero or negative actual amounts have no progress fill.
- These indicators use the summary’s planned totals, including adjustments from Include category overspending in summary totals, so they can differ from individual section or category indicators.
- Colored amounts indicate status:
- Income color — income or a positive balance
- Primary color — expenses within budget
- Red — overspending or a negative balance
- Difference shows how much you’re over or under your plan
Expense breakdown (tap to expand)
If your expenses are grouped by type (Needs, Wants, Savings), tap the Summary Card to expand and see:
- Needs (🔒) — essential expenses like rent, utilities, groceries
- Wants (❤️) — non-essential spending like entertainment, dining out, fun purchases
- Savings (🐷) — money set aside for savings and investments
Each type shows:
- Percentage of total expenses
- Planned vs actual amounts
- Progress bar toward the plan
Filter by type: Tap Needs, Wants, or Savings to filter the entire budget view and show only categories of that type.
Visual circles mode (optional)
If Circle Shortcuts is enabled under Display Settings → Circles, a grid of circular progress indicators appears near the top of the Budget screen (up to five section circles per row). You can tap anywhere in a circle's surrounding tile to open it:
- The Income circle appears only when the section has at least one category available in the selected budget. It remains visible even when the selected month or budget period has no income plans or transactions, unless income is hidden in that budget’s settings. Show all sections overrides that hiding for circle shortcuts. Selecting a Needs / Wants / Savings filter hides income circles.
- Each circle shows the section icon and fills based on spending progress
- A fully filled circle means you’ve reached the budget limit
- A red segment in an expense circle indicates the portion of spending above its plan
- With progress shown, section and category circles use the same proportional split as the section and category bars described below, without reducing border opacity for missing plans. Expense activity above a zero or missing plan displays a full red ring.
- With progress hidden for sections or categories, circles with a non-zero actual amount show a complete, solid border in their section color, regardless of the plan or overspending. Circles with a zero actual amount use the same muted neutral border as the unfilled track when progress is shown. Icons and category names keep their usual appearance.
To show unused sections too, open the Budget screen’s top-right Settings (gear) → Circles and turn on Show all sections. This is off by default and is disabled while Circle Shortcuts is off. Your choice is saved, including when you switch circles off and back on. Return to Budget to see the change.
- With Show all sections off, expense shortcuts require at least one category with a plan or transactions in the selected period. The Income exception above still applies.
- With it on, all sections with categories are available, including sections outside the selected custom budget and income sections hidden from the budget list. Sections without selectable categories are omitted. This affects circle shortcuts; it does not add plans or change the section list or budget totals.
- Circle amounts and progress use the selected month or custom date range. With Show all sections on, they include activity in categories excluded from a restricted custom budget. The main budget totals and section list still follow that budget’s restrictions, so circle amounts can differ from the budget list. Adding a transaction through an excluded category’s circle does not link that category to the custom budget; it can remain excluded from its totals.
- Needs / Wants / Savings still filters the shortcuts. With Show all sections on, matching categories without plans or transactions remain available.
- When Show all sections is on and a section has no categories with plans or transactions matching the active filter, tapping it shows its available categories immediately. Otherwise, unused categories remain behind the reveal control described below.
Tapping a section circle opens a bottom sheet for that section. The sheet shows:
- A short section summary (name, icon, and the same kinds of spent / planned / remaining / progress details controlled by your section display settings)
- A grid of category circles for that section (filtered by Needs / Wants / Savings when that filter is active on the Budget screen). Category names use up to three lines; longer names end with an ellipsis. Long-press a category circle and choose Edit to read its full name.
- Optional actual amount text under a category circle when your display settings show transaction amounts and the category has a non-zero actual
- If the section has hidden categories, a Show more (+N) control reveals them in the same grid
Tapping a category circle or its surrounding tile closes the sheet and opens the Add Transaction screen for that category (single-entry / save-and-close mode).
Long-press a section circle to open the same options as the section header's long-press or ⋮ menu (see Section actions). Long-press a category circle, including its surrounding tile, to close the category picker and open the same options as the category row. The same action availability rules apply as in the list. These shortcuts also work when Options Button is off.
To plan an existing unused category, tap its section circle, then Show more (+N) if the category is hidden. Long-press the category circle → Edit → Planned Amount, enter a non-negative amount, then tap the top-right checkmark to save. Saving creates a plan for the selected month or custom budget if the category did not have one. The active Needs / Wants / Savings filter still limits which categories appear; clear or change it on the Budget screen if needed. After editing or dismissing the category options, you return to Budget; tap the section again to reopen its category picker. The unused-category reveal is reset when the picker reopens, unless Show all sections automatically reveals those categories because the section has no visible planned or active categories.
There is no longer an Add (plus) circle in circles mode. To add a category, use the section menu in the list below, or More → Advanced Features → Categories.
Sets on Budget (Pro)
Turn on Display Settings → Sets → Show Sets to show a collapsible Sets block below the Summary Card and circle shortcuts, above the budget sections. Show Sets is off by default. Sets has its own switches for actual amounts, planned amounts, remaining amounts, percentages, and progress, independent of the category settings. Only actual amounts are on by default; the other set-item switches are off. Hiding the block or an amount preserves watched sets and saved plans. Sets requires Pro; the switches are disabled without Pro, and the block is hidden. The item switches are disabled while Show Sets is off.
Add and arrange watched sets
- Expand the Sets block and tap Add Set. If Action Buttons is off, long-press the block title or use its ⋮ → Add Set instead.
- Tap the Set field to open Select Set, or tap a quick-select chip below the field. Chips scroll horizontally and select a set without saving the form. The selection page lists sets not already on Budget. Its search icon shows a search field; searching matches set names, and hiding search clears it. Its + icon opens Create Set; after saving, the new set is selected automatically and you return to the plan form, like other selection pages. The list uses a bordered card with initial-letter circles, like the tag picker. Condition icons beneath each name match the Sets index, including red outlines for excluded conditions. A checkmark identifies the selected set. Back without selecting preserves the form’s selection. If no sets are available, use + to create one.
- The next row contains Planned amount, initially empty. Plan type always appears after the amount, including for sets based on tags or other conditions. It defaults to Expense; choose Income for a positive net target. Editing an existing plan preserves its saved plan type. Fields stack on narrow screens or with larger text. Enter the magnitude as a non-negative number. The plan applies to the budget period from which you opened the form. The amount helper says: “Leave empty to track without a plan.”
- Tap the top-right checkmark to save. Back without saving discards changes to this form; a set already created from the selection page remains saved.
Watched sets are global: once added, a set appears in all calendar months and custom periods. You do not add it again each period. On the Sets screen, a link icon beside the set name means it is included here. That set’s menu offers Add to Budget or Unlink from Budget, which adds or removes it immediately without opening this plan form. Add to Budget requires Pro. See Watching sets on Budget. Change Order in the block's menu opens the existing Sets ordering screen; that order applies both here and on Sets. When opened from Budget, it shows all saved sets, with sets not watched on Budget dimmed to indicate that they are not visible in the block. Dimmed sets remain reorderable; dragging them does not add them to Budget. From the main Sets screen, all entries have normal opacity. Tap the block header to collapse or expand it. The eye icon on the right side of the header shows or hides sets without transactions for this period. A count just after that icon, on the right side of the header, shows how many sets are currently displayed. The same action is in the block menu. Long-press menus remain available when Options Button hides ⋮ controls. An empty block explains how to add sets. Loading shows a progress indicator; a load failure offers a retry instead of showing zero totals.
Amounts and matching transactions
With the default set-item switches, each row shows the set’s name and actual net amount. Income minus expenses determines the net, with refunds included in that calculation. Like category spending amounts, net spending is displayed without a minus sign; net income has a + prefix and uses the income section color, whether the plan is empty, zero, or positive. A set with no matching transactions remains visible with 0 unless you hide empty sets. The eye icon on the Sets header and Hide sets without transactions in the block menu hide watched sets with no matching transactions in the selected period, including recurring previews when future transactions are included. Hiding empty sets does not unlink them. If every watched set is hidden, the block explains that none have transactions in this period. Change Order still lists all saved sets. Currency formatting and Hide numbers apply as elsewhere in Budget.
The block uses the selected budget period's dates, replacing each set's saved dates for this view without editing the set. All other set conditions still apply. The block does not restrict sets to a custom budget's selected categories and does not apply the Needs / Wants / Savings filter. Its amounts can therefore cover transactions outside the main budget sections. Set amounts and plans never add to Budget's main summary totals.
Include future transactions in budget controls saved future/planned transactions and matching recurring previews in the Budget block's amounts. When off, both are excluded from those amounts. Tap a set row, or choose Transactions in its menu, to open the set's transactions for the same period. The transaction screen uses its usual History and Upcoming views, including matching future transactions and recurring previews regardless of this Budget setting. Returning keeps the Budget period and watched sets. Analytics opens the set's analytics for the selected dates, using that screen's usual controls.
The Sets block has no combined total. Its rows are independent views of their matching transactions. The Sets block is not included in budget PDF exports or web-share snapshots.
Set plans
Plan amounts are separate for every month or custom period, with no automatic carryover. An empty Planned amount means there is no plan for that period. Remaining, percentage, progress, and the planned value are hidden; the actual net appears beside the name when any amount or progress switch is enabled. New plans start empty. Entering 0 saves a real zero plan and enables plan comparisons according to the display switches. × / Clear plan empties the field, including when it contains 0; save to remove the plan for this period without unlinking the set.
- Edit Set Plan in a row's ⋮ or long-press menu opens the same Planned amount / Plan type form with the set fixed. The amount changes only the displayed period. The plan type is global for that watched set and controls plan comparisons across periods; it does not change the set's conditions or displayed net.
- Expense compares the plan against expenses minus income and refunds. A plan of 500, expenses of 400, and income of 100 means 300 net spending and 200 left.
- Income compares the plan against income minus expenses. A plan of 500, income of 700, and expenses of 300 means 400 net income and 100 left to reach the target.
- Tap Planned amount to open the Number Picker. Negative amounts are not allowed. Clear the field with × to remove the plan, or confirm 0 in the picker to save a zero plan. Save with the top-right checkmark; Back discards unsaved changes.
- Display Settings → Sets has the same item controls as categories, but changing them affects only set rows: Total Transaction Amount, Planned Amount, Remaining/Overspent, Percentage of Remaining/Overspent, and Progress Indicator. Rows use the category layout: remaining or over-plan amounts beside the name, actual / planned amounts below, the remaining percentage on the right, and a progress bar underneath when enabled. Percentage is remaining divided by plan (for example, 50 spent against 100 planned leaves 50%). Above a positive plan it shows the excess percentage in the same color as category over-plan values. At exactly the plan, the remaining amount and percentage are hidden. With a saved 0 plan, the planned amount shows 0 when enabled. Positive activity in the plan’s direction is entirely over plan: the percentage shows 100%, and progress is fully filled (red for Expense plans, income color for Income plans). With no activity, remaining and percentage are hidden and progress has no fill. Activity opposite to the plan’s direction shows 0% and no progress fill. Only an empty plan hides all plan comparisons and disables over-plan coloring. These switches work independently, so Percentage of Remaining/Overspent can be shown while Planned Amount is hidden.
- When the planned value is visible and Quick plan update is on, tap its dotted underline in the Budget row to update this period's amount directly. With Quick plan update off, use Edit Set Plan. The quick picker may offer the current positive net amount in the plan's direction as a shortcut.
- Copy Plan includes eligible watched sets alongside categories. Choose the source period, select the sets to copy, and save. Only sets with a saved source plan and an empty destination plan appear. A saved 0 plan can be copied and prevents an existing destination plan from being overwritten. Clear the destination plan first if you want to copy another plan into that period. Copying changes neither the global watched list nor plan types. Set plans can be copied even while their Budget display is hidden. Deleted custom periods are not available as Copy Plan sources.
Edit Set opens the full filter editor and preserves the Budget selection and plans. Unlink from Budget uses a broken-link icon and immediately removes the set from this block in every period, without deleting the saved set or its period plans. Adding it again restores any plan saved for the selected period. Deleting the saved set itself on Sets removes it and its plans.
Budget sections
Your budget is organized into sections (for example, “Housing”, “Transportation”, “Income”, etc.). Each section contains related categories.
Section header
Each section shows:
- Section icon and name — its identity with a custom color
- Arrow indicator — whether the section is expanded (↑) or collapsed (↓)
- Amount left or Amount spent — depending on your display settings
- Progress bar (optional) — visual indicator of spending vs plan
- Percentage (optional) — how much of the budget is used or remaining
Expand/collapse sections
- Tap anywhere on the section header to expand or collapse it
- Expanded sections show all categories inside
- The app remembers which sections you expanded
Section actions (long press or menu)
Long-press a section header (or tap the ⋮ menu if it’s shown) to access:
- New Income Source or New Expense Category — add a new category to this section (label depends on section type)
- Transactions — view all transactions in this section
- Trends — view a plan vs actual chart by month
- Analytics — open charts and reports for this section
- Edit — change the section name, icon, or color
- Delete Plan — remove the budget plan (only if there are no transactions)
- Delete — permanently remove the section (only if it has no categories)
Budget categories
Inside each section you’ll see categories (for example, “Groceries”, “Electricity”, “Salary”, etc.).
Category display
Each category shows:
- Category name — with a recurring icon (↻) if it’s linked to recurring transactions
- Amount left or Amount spent — depending on your display settings
- Spent / Planned — actual spending versus the budgeted amount
- Tappable planned amount — when planned amounts are visible and Quick plan update is on, the planned value is shown with a subtle dotted underline to indicate that you can tap it. When Quick plan update is off, the amount is not underlined and is not tappable
- Percentage — how much of the category budget is used or remaining
- Progress bar (optional) — visual indicator of spending progress
Color coding
- Section color — normal spending within budget
- Red — overspending (exceeded the planned amount)
- Gray — remaining amount to spend
Section and category progress bars, circle rings, and the section summary bar inside the circle category picker show exact proportions:
- Up to the plan, the section-colored fill shows actual spending relative to the plan; the rest is an empty gray track. A plan of 500 with 250 spent fills half the indicator.
- Above an expense plan, the full indicator represents total spending. The section-colored portion is the amount covered by the plan; the red portion is the excess. A plan of 500 with 1,000 spent is half section color and half red; with 600 spent, one-sixth is red.
- A thin divider marks where the section-colored portion meets the red excess in bars and rings. It appears only when both portions are present; it does not enlarge the red portion.
- Red segments have no minimum size. Spending 501 against a 500 plan produces a very small red segment that may be hard to see. Existing amount colors still apply; no additional overspending label is added.
- Positive expense spending with a zero or missing plan is fully red. Zero or negative net spending (for example, after refunds) leaves the indicator empty.
- Income uses its section color up to the plan. Above a positive income plan, bars and rings show the planned share in the section color and the surplus in a lighter green, separated by a thin divider. With 500 planned and 1,000 received, each portion occupies half the indicator. Positive income with a zero or missing plan keeps a full section-colored indicator. No divider appears at or below the plan, or with a zero or missing plan.
These rules apply when the corresponding section or category progress display is enabled. The summary card’s indicators and their display conditions are described under Summary Card above.
Category actions
Tap a category to view all transactions for that category.
Tap the planned amount in the category row to quickly change that category’s planned value without opening the full edit screen. This is available only when Quick plan update is on in Display Settings (it is on by default). It opens the Number Picker with the current planned amount prefilled. If the category has actual spending, the picker can also offer that spent amount as a one-tap quick-select value. When Quick plan update is off, use Edit on the category instead.
Long-press a category (or tap the ⋮ menu if shown) to access:
- Add Transaction — quickly add a new transaction to this category
- Transactions — view all transactions for this category
- Trends — view a plan vs actual chart by month
- Analytics — open charts and detailed reports
- Edit — change the category name, planned amount, or settings
- Delete Plan — remove the budget plan for this month (only if there are no transactions)
- Delete — permanently remove the category (only if there are no transactions and no recurring templates)
Adding categories to a section
At the bottom of each expanded section there’s a New Income Source or New Expense Category button to quickly create a new category within that section. These in-list buttons appear only when Action Buttons is on in Display Settings (it is on by default). The ☰ menu still offers Add Category when the buttons are hidden.
Edit Section screen
Opened when you choose Edit from a section’s long-press or ⋮ menu. Use it to change the section’s identity and appearance.
Fields and actions:
- Section name — text field; required. Duplicate names (compared to other sections) are not allowed.
- Icon — tap to open an icon picker (bottom sheet). Different icon sets for income vs expense sections.
- Color — tap to open a color picker: “Default” (app primary) or a grid of preset colors.
Saving: Tap the ✓ (check) button in the app bar. Validation runs before save (non-empty name, no duplicate).
Edit Category screen
Opened when you choose Edit from a category’s long-press or ⋮ menu. Use it to change the category’s name, section, type, and (when editing from the budget) its planned amount.
Fields and actions:
- Section — read-only for income categories; for expense categories, tap to open a section picker and move the category to another expense section.
- Category name — text field; required. Duplicate names (compared to other categories) are not allowed.
- Category type (expense categories only) — Needs, Wants, or Savings with short descriptions. Used for the Summary Card breakdown and filtering.
- Planned amount (when not hidden) — tap to open a number picker. Required and must be ≥ 0. An icon opens History for this category (spending history screen).
- Last months’ history — when the category has plan/actual data, a block shows the last several months with planned vs actual amounts and a progress bar. Tap an actual or planned amount to copy it into the planned amount field for the current month.
Saving: Tap the ✓ (check) button in the app bar. Validation: non-empty name, no duplicate name, valid amount (when amount is shown). When opened from the budget screen, both the category and its plan are updated; when opened from elsewhere (e.g. categories screen) with plan hidden, only the category (name, section, type) is updated.
Quick actions
Copy a budget plan from another period
If you’re starting a new month or custom period and want to use an existing plan as a template:
- Tap the menu button (☰) in the top right
- Select Copy Plan
- Choose the month or custom period you want to copy from
- Review the list of category plans from that source period
- Select the categories you want to import, then tap the check button to apply them
Important details:
- Budgetum imports only the selected category plans, not a forced full clone of the entire source budget
- Categories that already exist in the current target period are skipped and do not appear in the import list
- When a previous plan source is found automatically, Budgetum preselects all eligible categories so you can import them faster
A Copy Plan button also appears below the sections when Action Buttons is on, the current selection has at most one category with a plan, and other plan sources are available. The ☰ menu still offers Copy Plan when the in-list button is hidden.
New month reminder
When a new calendar month starts, the Budget screen can ask A new month has started. The dialog shows last month (for example, From last month: November 2026) and offers Copy Plan and Not now. Copy Plan switches Budget to the current month if last month was still selected, then opens the same Copy Plan screen with last month already chosen as the source and all its categories preselected; review them, untick any you don't need, and tap the check button to copy. Not now (or tapping outside) closes the dialog; you can still use Copy Plan from the ☰ menu at any time.
The reminder appears at most once per month, when you open the app or return to it from the background while the Budget tab is shown and no other screen is open. If you are on another tab at that moment, it waits until the next time. It appears only if:
- the current month or last month is selected (not an older or later month, and not a custom period). Budget reopens on the month you viewed last, so on the first open of a new month it usually still shows last month
- last month has plans (category plans, or set plans with Pro)
- this month has no plans yet (no category plans, and no set plans with Pro); once you plan anything in the new month, the reminder is not shown
If last month had no plans, Budgetum does not ask, even when an older month or a custom period has plans. Ended custom periods have their own dialog; see Custom Budget Periods.
Export budget as PDF or web link
Use Export PDF from the Budget screen menu to open the budget export flow for the period you are currently viewing.
Export settings (gear icon on the export screen):
- Group by expense type — group expense categories under Needs, Wants, and Savings when applicable
- Show section titles — include section headings in the output
- Show planned values / Show actual values — at least one must stay on; both can be included in PDF and web share
PDF preview:
- Live preview of the report; use the system share/print actions from the preview bar to save or send the PDF
Web share link (link icon on the preview bar):
- Generates a read-only web view of the budget plan for the selected period
- Choose whether the shared view includes planned and/or actual amounts (at least one required)
- Copy the URL to share; links expire after a limited number of days (shown when the link is ready)
Other details:
- The export follows the active period selector (month or custom budget period)
- Change the selected period on the Budget screen before exporting if you need a different range
- Shared links expose budget structure and amounts you include—share only with people you trust
“New Expense Section” button
Below your existing sections (and the Copy Plan button when it’s shown) there’s a New Expense Section button to create a new budget grouping. It appears only when Action Buttons is on. The ☰ menu still offers New Expense Section when the button is hidden.
Getting started help
When you first start using the app, a helpful guide appears at the bottom of the Budget Screen with tips on:
- Making a list of expected expenses for the month
- Grouping them into sections
- Adding transactions to track actual expenses
It also shows section examples (e.g. Housing, Travel, Car). You can dismiss this guide once you’re comfortable.
Display customization
You can customize the Budget Screen to show exactly what you need. Open Display Settings from the top-right Settings button or from the menu.
General options
- Quick plan update — tap a category’s planned amount to update it directly. On by default. When off, the planned amount is not tappable or underlined.
- Options Button — show or hide the ⋮ menu buttons on sections and categories. When off, options appear on long press instead of a button.
- Action Buttons — show buttons for adding sections and categories or copying a plan. On by default. When off, the in-list Copy Plan, New Expense Section, and New Income Source / New Expense Category buttons are hidden; the ☰ menu still has those actions.
- Include Upcoming Transactions in Budget — include or exclude future-dated transactions from the current budget totals. When this is on, upcoming transactions already affect the Budget screen's actual totals and progress bars. When it is off, the Budget screen only counts transactions that are not in the future.
Circles options
- Circle Shortcuts — show or hide the section circle grid; on by default.
- Show all sections — include all sections with categories, regardless of the selected budget; off by default. Available only while Circle Shortcuts is on. See Visual circles mode for display rules and tapping behavior.
Summary card options
- Hide summary card — hide the Summary Card on the Budget screen. Off by default. When it is on, the card is gone; the Back to current month button still appears when a past or future calendar month is selected.
- Show/hide planned values
- Show/hide actual values
- Show/hide the difference column/value
- Hide Decimals — show Summary Card amounts rounded to whole numbers (for example
1,235instead of1,234.56). On by default. Turn it off to see exact amounts with cents in the Income, Expenses, and remaining values. The Needs / Wants / Savings amounts on the card follow the same setting. Applies to the Budget screen only. Only display changes; totals are calculated from the exact amounts either way. - Include category overspending in summary totals. When this is on, any amount spent above a category's plan is added to the summary card's planned totals, so the overall remaining amount reflects that overspending more realistically.
If either planned values or actual values are hidden, the Difference setting becomes unavailable because the comparison needs both values.
Section display options
- Show/hide planned amounts
- Show/hide spent amounts
- Show/hide remaining amounts
- Show/hide remaining percentage
- Show/hide progress bars
Category display options
- Show/hide planned amounts
- Show/hide spent amounts
- Show/hide remaining amounts
- Show/hide remaining percentage
- Show/hide progress bars
Tips for using the Budget Screen
- Check it regularly — open the Budget Screen daily or weekly
- Use sections wisely — group related expenses for easier management
- Watch the colors — red means overspending
- Tap for details — tap any category to see exactly where your money went
- Filter by type — focus on Needs, Wants, or Savings
- Copy previous budgets — use Copy Plan to save time