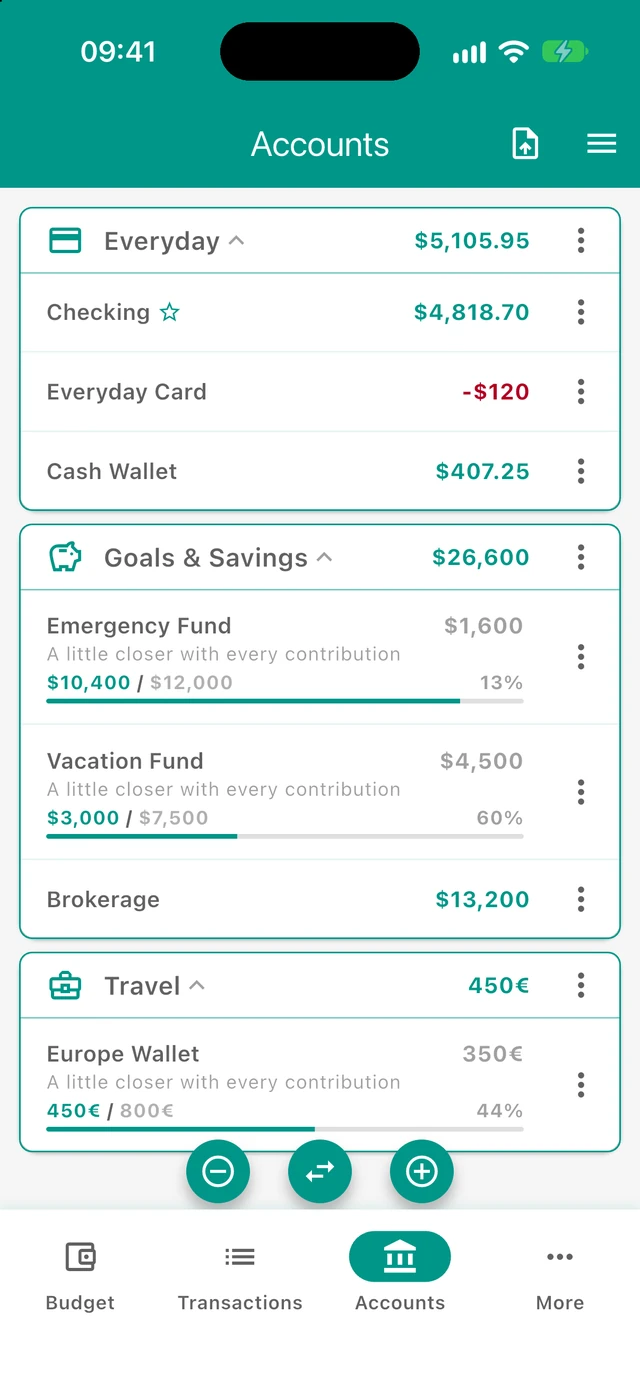
Accessing the Accounts Screen
You can access the Accounts Screen by:
- Tapping the "Accounts" tab in the bottom navigation
Understanding Account Groups
Account groups help you organize related accounts together. For example, you might have:
- Main Accounts - Your primary checking account, savings, and cash
- Credit Cards - All your credit cards in one place
- Investments - Brokerage accounts, retirement funds
- Savings Goals - Separate accounts for vacation, emergency fund, etc.
- Debts - Loans, mortgages, money you owe
Each group displays its own icon and shows the combined total balance of all accounts within it (when all accounts share the same currency).
Screen Layout
Account Groups
The main area displays your account groups as expandable cards. Each group card shows:
- Group icon (on the left) - A visual identifier for the group type
- Group name - The name you gave the group (e.g., "Main Accounts", "Savings")
- Total balance (on the right) - The combined balance of all accounts in the group
- Only shown when all accounts in the group use the same currency
- Positive balances appear in the app's primary color
- Negative balances appear in red
- Menu button (three dots) - Opens group actions
Expanding and Collapsing Groups
- Tap the group header to expand or collapse it
- When expanded, you'll see all accounts within that group
- When a group has no accounts, an Add account button appears inside the group card for quick access
- The app remembers which groups you had expanded, so they stay that way when you return
Individual Accounts
Within each expanded group, accounts are listed showing:
- Account name - The name you gave the account (e.g., "Chase Checking", "Cash Wallet")
- Default indicator (star icon) - Shows if this is your default account
- Description - Any notes you added about the account
- Balance - Current account balance with currency symbol
- Positive balances appear in the primary color
- Negative balances appear in red
- Goal progress - If the account has a goal, the row shows current balance vs target balance, remaining or over-goal amount, remaining percentage, and a progress bar
- Menu button (three dots) - Opens account actions
Quick Action Buttons
At the bottom of the screen, you'll find floating action buttons for common tasks:
When You Have One or More Accounts
- Decrease Balance (minus icon) - Quickly record a balance decrease on any account
- Increase Balance (plus icon) - Quickly record a balance increase on any account
When You Have Two or More Accounts
- Transfer (swap arrows icon) - Move money between your accounts
These buttons provide fast access to the most common account operations without needing to open the menu.
Top Bar Actions
When at least one active account exists, the top bar shows:
- Match bank statement (upload icon) - Opens Statement Import. Free users see a gold Pro badge on the icon; tapping it opens the Pro upgrade page instead of import. Pro users go straight to Statement Import (choose the account there if it is not already selected) → Bank statement matching
- More menu (menu icon) - Opens the options listed below
Top Bar Menu
Tap the menu icon in the top right corner to access additional options:
Add Group
Create a new account group to organize your accounts. Groups can have custom names and icons.
Add Account
Create a new account. You'll need to:
- Select which group it belongs to
- Enter a name for the account
- Set the starting balance
- Choose the currency
- Optionally add a description
- Optionally set it as your default account
- Optionally set a balance goal for the account
Transfer Between Accounts
Move money from one account to another. This is useful for:
- Recording bank transfers
- Moving money between checking and savings
- Tracking credit card payments
- Recording any money movement between your accounts
Increase Balance
Add money to an account without creating a regular income transaction. Use this for:
- Corrections when your balance doesn't match your bank
- Initial deposits when setting up a new account
- Any balance adjustment that shouldn't appear as regular income
Decrease Balance
Remove money from an account without creating a regular expense transaction. Use this for:
- Corrections when your balance doesn't match your bank
- Fees or charges that don't fit a budget category
- Any balance adjustment that shouldn't appear as regular expenses
Match bank statement
Import a CSV or XLSX bank statement and reconcile rows with existing transactions (same destination as the top-bar upload icon). Free users see a Pro badge on this row and are sent to the Pro upgrade page; Pro users open Statement Import → Bank statement matching
Change Order
Rearrange the order of your account groups and accounts within groups. Drag items to reorder them however you prefer.
Archive
View and manage your archived accounts and groups. Archiving lets you hide accounts you no longer use while keeping their history.
Account Actions
Tapping an Account
Tap any account to view all transactions for that account. This opens a filtered transaction list showing:
- All income and expenses involving this account
- Transfers to and from this account
- Balance adjustments
- The account's transaction history over time
Long-Pressing an Account (or Tapping the Menu Button)
Opens a menu with these options:
- Increase Balance - Add money to this specific account
- Decrease Balance - Remove money from this specific account
- Match bank statement - Import a CSV or XLSX bank statement for this account and reconcile statement rows with existing transactions (Pro; free users see a Pro badge and are sent to upgrade) → Bank statement matching
- Flow Chart - Open an account-specific flow screen with inflow, outflow, and balance trends for that account across the selected period
- Analytics - Open the general Analytics screen filtered to this account for breakdowns by category, contact, tag, description, and more
- Edit - Change the account's name, description, currency, balance, group, default status, or goal
- Archive - Hide the account from the main list (keeps all history)
- Delete - Permanently remove the account (only available if the account has no transactions)
Note: You cannot delete an account that has transactions. Archive it instead to hide it while preserving your financial history.
Account Flow Chart
The account flow chart is a dedicated screen for understanding how money moves through one account over time.
What It Shows
- Period picker in the top bar - Change the date range for this account
- Summary card - Total inflow and outflow for the selected period
- Flow type filters - Switch between All, Inflow, Outflow, and Balance
- Trend chart - View the account's movement grouped by days, weeks, months, or years depending on the selected range
Unlike the general Analytics screen, this account flow view is focused on money moving in and out of the selected account itself.
Account Goals
Account goals let you track progress toward a target balance on a specific account. They are useful for savings targets such as an emergency fund or vacation fund, and can also represent a balance you want to reach when paying down an account.
Setting a Goal
When creating or editing an account, tap Set goal to show the goal fields:
- Target balance - The balance you want this account to reach
- Goal start - The balance where progress starts; this defaults to the account's current balance when you enable the goal
If you set a target balance and leave Goal start empty, Budgetum uses the account balance as the starting point for goal progress.
How Goals Are Displayed
Accounts with goals show extra progress information directly in the account list:
- Current balance compared with the target balance
- Amount remaining until the target, or the amount over the target after passing it
- Remaining or over-goal percentage
- A small progress bar
Progress is calculated from the Goal start balance to the Target balance. If the target is higher than the start, progress increases as the balance grows. If the target is lower than the start, progress increases as the balance goes down toward the target.
Editing or Removing a Goal
Open the account menu and choose Edit to change goal values. Clearing the target balance removes the goal from the account.
Account Group Actions
Long-press a group header (or tap the menu button) to see group options:
- Add Account - Create a new account within this group
- Edit - Change the group's name or icon
- Archive - Hide the entire group (and all its accounts) from the main list
- Delete - Permanently remove the group (only available if the group has no accounts)
Creating a New Account
When adding a new account, you'll fill in:
Required Fields
- Group - Which group this account belongs to
- Name - A unique name for the account (e.g., "Main Checking", "Vacation Savings"). Duplicate names are not allowed.
- Starting Balance - The current balance in this account
Optional Fields
- Currency - Defaults to your app's primary currency, but can be different for foreign accounts. Foreign-currency accounts can be used for normal income and expense transactions (with a separate budget amount), for multi-currency transfers, and for balance tracking. Receipts and the default-account option stay limited to the primary currency.
- Description - Notes about the account (e.g., "Emergency fund - don't touch!")
- Set as Default - Make this your default account for new transactions (only available for accounts using your primary currency)
- Goal - Optional target balance and starting balance used to show progress in the account list
Transfers Between Accounts
When transferring money, you'll specify:
- From Account - The account sending money
- To Account - The account receiving money
- From Amount - How much is leaving the source account
- To Amount - How much is arriving in the destination account (automatically matches the from amount, but you can change it for currency conversions or fee adjustments)
- Date - When the transfer happened
- Description - Optional notes about the transfer
- Make Recurring - Set up automatic repeating transfers
Multi-Currency Transfers: If you're transferring between accounts with different currencies, you can enter different amounts for "from" and "to" to account for exchange rates. The amount picker may offer an optional market-rate quick suggestion between the two currencies. When both amounts are filled, the form can also show a muted implied rate helper under the amount fields (destination ÷ source from the numbers you entered)—this is not a live market quote.
Scheduled Transfers: If you set a future date, you can optionally mark the transfer as requiring confirmation before it affects your balances.
Balance Adjustments
Balance adjustments let you correct your account balance without creating regular transactions. This is useful when:
- Your tracked balance doesn't match your actual bank balance
- You find discrepancies during reconciliation
- You need to account for fees that don't fit a category
- You receive or lose money outside your normal transactions
Increase Balance
Adds money to an account. Records when and why the balance increased.
Decrease Balance
Removes money from an account. Records when and why the balance decreased.
Both adjustment types support:
- Setting a specific date
- Adding a description
- Making it recurring (for regular adjustments like monthly bank fees)
- Requiring confirmation for future-dated adjustments
Archive
The Archive stores accounts and groups you've hidden from your main view. Archiving is perfect for:
- Old bank accounts you've closed
- Credit cards you've paid off
- Temporary accounts you no longer use
- Keeping your main list clean and focused
Viewing the Archive
Access the archive from the top bar menu. Here you'll see all archived groups and accounts.
Archive Actions
For archived groups:
- Restore - Bring the group back to your main list
- Delete - Permanently remove (only if the group has no accounts)
For archived accounts:
- View Transactions - See the account's transaction history
- Restore - Bring the account back to its group
- Delete - Permanently remove (only if the account has no transactions)
Reordering Accounts and Groups
From "Change Order" in the menu, you can customize how your accounts appear:
Reordering Groups
Drag and drop groups to arrange them in your preferred order. The first group appears at the top of your Accounts screen.
Reordering Accounts Within a Group
Tap a group to open the account order view for that group, then drag and drop to reorder its accounts. This affects the display order within that group.
Getting Started Help
When you first open the Accounts screen (or have no account groups), you'll see a helpful guide explaining:
- How account groups work
- Suggested group structures
- Examples of common setups
You can dismiss this guide once you're comfortable with the concept. The guide provides examples like:
- Main Accounts - Checking, Savings, Cash
- Debts - Credit Cards, Loans, Mortgages
- Investments - Stocks, Retirement, Crypto
- Savings Goals - Emergency Fund, Vacation, Car
- Other - Gift Cards, Prepaid Cards
Tips for Using Accounts
-
Use groups strategically - Organize accounts by purpose (spending, saving, debt) rather than by institution
-
Set a default account - Your most-used account should be the default, so it's pre-selected when adding transactions
-
Keep balances accurate - Regularly compare your app balances to your actual accounts and use balance adjustments to fix any differences
-
Use descriptions - Add notes to accounts to remember their purpose or any special rules
-
Use transfers for internal movement - When you move money between your own accounts, use Transfer rather than creating separate income/expense transactions
-
Consider negative balances - Credit cards and loans typically have negative balances, which is normal and expected